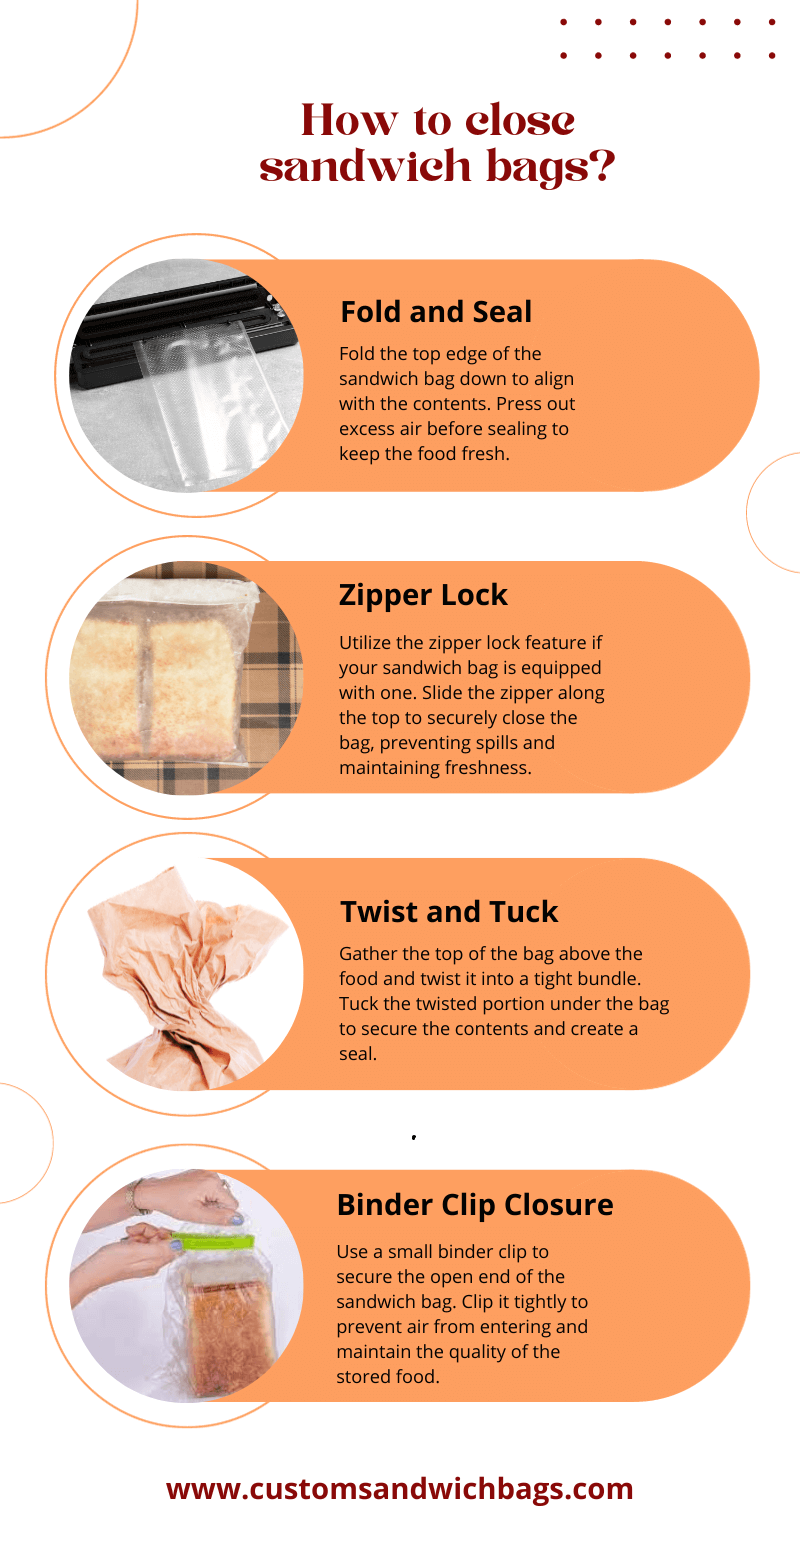
How to close sandwich bags?
Closing sandwich bags may seem like a simple and mundane task but mastering the art of properly sealing these versatile food storage containers is essential for maintaining the freshness of your snacks and meals.
Whether you’re packing a lunch for school or work, storing leftovers or preparing sandwiches for a picnic, knowing how to securely close a sandwich bag can make a significant difference in preserving the flavour and quality of your food.
In this guide, we will explore various techniques and tips for sealing sandwich bags effectively, ensuring that your culinary creations stay fresh and delicious until it’s time to enjoy them.
So read on.
How to close sandwich bags?
There are several ways to close a sandwich bag and the method you choose may depend on personal preference or the type of bag you are using.
Here are some common techniques for sealing sandwich bags:
- Zipper Closure: Most modern sandwich bags come equipped with a zipper closure that runs across the top of the bag. To seal your bag using this method, simply slide the slider along the zipper track until it reaches the other side of the bag. This will create an airtight seal, preventing any air or moisture from entering the bag.
- Fold-over Closure: Another popular method for closing sandwich bags is to fold over the top of the bag and press it down firmly to create a tight seal. This method works best with thicker plastic bags that are less prone to tearing. You can also use a binder clip or twist tie to secure the folded-over flap and keep your food fresh.
- Press-and-Seal Closure: Some sandwich bags are designed with a special adhesive strip that allows you to easily press down on the top of the bag to create a seal. This method is quick and efficient but it may not be as secure as other closures. Make sure to press down firmly on the adhesive strip to ensure a tight seal.
- Knot Closure: This method is commonly used for sandwich bags made from thinner plastic, such as those used for freezer storage. Simply gather the top of the bag and twist it tightly, then tie a knot in the plastic near the opening of the bag. This will create an airtight seal that is less likely to come undone.
- Vacuum Seal: If you want to take your sandwich bag sealing game to the next level, you can invest in a vacuum sealer that removes all air from the bag before sealing it shut. This method is perfect for storing delicate foods like chips or crackers, as it prevents them from getting crushed while also keeping them fresh.
Now that you know some different methods for sealing sandwich bags, let’s look at some tips and tricks to ensure your food stays fresh and tasty. So read on.
Tips for sealing sandwich bags
- Use Quality Bags: Start with good-quality sandwich bags. Look for ones with a sturdy zipper or seal to ensure they close securely.
- Remove Excess Air: Squeeze out as much air as possible from the bag before sealing. This helps prevent the food from getting squished and keeps it fresher longer.
- Proper Filling: Don’t overfill the bag. Leave some space at the top to make sealing easier and to prevent the bag from bursting.
- Clean Seal Area: Ensure the seal area is clean and dry. Any crumbs or moisture on the seal can interfere with the closure.
- Zipper Seal: If your bag has a zipper-style seal, press along the zipper track with your fingers or thumbs to close it securely. Make sure the two sides are fully interlocked.
- Press Out Air: If your bag doesn’t have a zipper, press the bag closed while simultaneously pushing out any remaining air. Once the bag is flat, you can use the methods below to seal it.
- Double Bagging: For extra protection, you can double-bag your sandwiches. Place the filled bag inside another bag for added security.
- Label and Date: Don’t forget to label and date your sandwich bags if you’re storing food for later. This helps you keep track of freshness.
- Store Properly: Once sealed, store your sandwich bags upright in the refrigerator or pantry to prevent any accidental leaks.
By following these tips and using the right method for your sandwich bag, you can ensure that your food stays fresh and tasty for longer.
So next time you pack a sandwich or store leftovers, remember to seal the bag properly for maximum freshness.
Common mistakes to avoid when sealing a sandwich bag
While sealing a sandwich bag may seem like a simple task, some common mistakes can lead to food spoilage or messes.
Here are some mistakes to avoid when closing a sandwich bag:
- Not Checking for Tears or Holes: Before filling your sandwich bag, always check for any tears or holes in the plastic. Even a small tear can compromise the seal and allow air and moisture to enter, leading to spoiled food.
- Not Removing Excess Air: As mentioned earlier, removing excess air from the bag is crucial for maintaining freshness and preventing squished food. Always squeeze out as much air as possible before sealing.
- Freezer Burn: When sealing a sandwich for the freezer, make sure to remove as much air as possible. Air in the bag can lead to freezer burn, which can affect the taste and texture of your sandwich.
- Overfilling the Bag: Trying to cram too much food into a sandwich bag can cause it to burst or make it difficult to properly seal. Leave some space at the top of the bag for easier sealing and to prevent spills.
- Using a Dirty Seal Area: Make sure to clean and dry the seal area before closing the bag. Any crumbs or moisture can prevent the seal from properly locking, leading to leaks and stale food.
Troubleshooting common issues
Even with the best techniques and tips, sometimes sandwich bags can still cause problems
Here are some common issues that you may encounter when trying to seal your sandwich bag:
- Tearing: Thin plastic bags or those that have been reused multiple times, are more likely to tear when being sealed. To prevent this issue, try using a thicker bag or avoid overfilling the bag.
- Leaking: If your sandwich bag is leaking, it could be due to a damaged seal or an unevenly closed zipper. Make sure to check the seal and reseal the bag carefully.
- Air Pockets: When using a fold-over closure method, you may end up with air pockets trapped inside the bag. To avoid this, gently press down on the top of the bag while sealing it to remove any excess air.
- Misalignment: Sometimes the zipper on a sandwich bag can become misaligned, making it difficult to fully close or open the bag. If this happens, gently pull the two sides of the zipper back into alignment and try again.
By being aware of these common issues, you can troubleshoot and find solutions to ensure your sandwich bags are sealed properly.
With the right technique and a little practice, sealing sandwich bags will become second nature, keeping your food fresh and delicious for all your on-the-go meals.
FAQ’s
Are there special sandwich bag closures available in the market?
Yes, there are indeed special sandwich bag closures available in the market. These include twist ties, bag clips and even heat sealers.
Twist ties are a simple and cheap option, available in various lengths and colors. Bag clips are another popular choice; they are reusable and often come in packs with different sizes.
Heat sealers offer a more permanent solution by melting the plastic to form a seal but they are typically more expensive and require an electricity source. These options can provide a stronger seal than simply using the built-in closure of the bag, ensuring your food stays fresh for even longer.
Are sandwich bags safe for food storage?
Sandwich bags made for food storage are generally safe to use. Just ensure they are free from harmful chemicals and approved for food contact. Always check the packaging for any specific usage instructions.
What’s the best way to seal a sandwich bag without a twist tie or clip?
If you don’t have a twist tie or bag clip, there are still options for sealing your sandwich bag securely. You can try using a rubber band, hair tie or even a piece of string to tie off the top of the bag. Another option is to use adhesive tape such as washi tape or clear tape to secure the folded-over portion of the bag.
However, keep in mind that this method may not be as effective for storing food for longer periods as it doesn’t provide an airtight seal like other closures do. Overall, be creative and use whatever resources you have available to ensure your sandwich bag is sealed properly.
Final Words
Properly sealing a sandwich bag may seem like a small detail but it can make a big difference in maintaining the freshness of your food.
By following the tips and techniques mentioned in this guide, you can ensure that your sandwiches and leftovers stay tasty and safe to eat for longer periods.
Remember to check for tears or holes before filling your bags, remove excess air and store them upright in the fridge or pantry. If you encounter any issues, refer back to our troubleshooting section for solutions. With these tips in mind, you’ll become an expert at sealing sandwich bags in no time!